Showing posts with label SQUIRREL!. Show all posts

Thursday, November 19, 2020

Hobo Heart


Back in August, which was decades ago, Sarah posted a photo of a new Jen Kingswell design called "Boho Heart." I was immediately smitten with the idea of forming one giant heart out of many smaller blocks. That squirrel ran up my leg and sat in my lap, chattering, "Drop everything and make it!"

At the time, the pattern wasn't available to purchase, so I decided to use the photo as inspiration and wing it using orphan blocks donated to Covered in Love and lots of scrappy white and cream for the background. 


I chose orphan blocks with bright, saturated colors and black accents for this one. Check out those fun, wonky stars!


I love this card trick block, too. Along the diagonal edges of the heart shape, I used various sizes of half square triangles with one half bright, the other half white/cream. Finding and accurately placing those HSTs was the hardest part, and many partial seams were needed. 


For the back, I used lots of wild, bright chunks. Some were a bit too bright and the colors bled all the way through to the front. Yikes! Fortunately, a second washing using blue Dawn dishwashing soap removed all the bleeding. Whew!


The quilting is almost invisible among the scrappiness, just simple stippling in the heart and floppy feathers in the background. The binding is scrappy brights from my leftover binding strips.


I'm calling my derivative version Hobo Heart as a nod to our traveling life, and I'm really happy with how it turned out. I'm grateful to Jen Kingswell for her amazing design idea, and to Sarah for sharing it. Piecing square blocks of all sizes into the heart shape was a real brain puzzle: challenging and rewarding. I'll definitely be making another one!
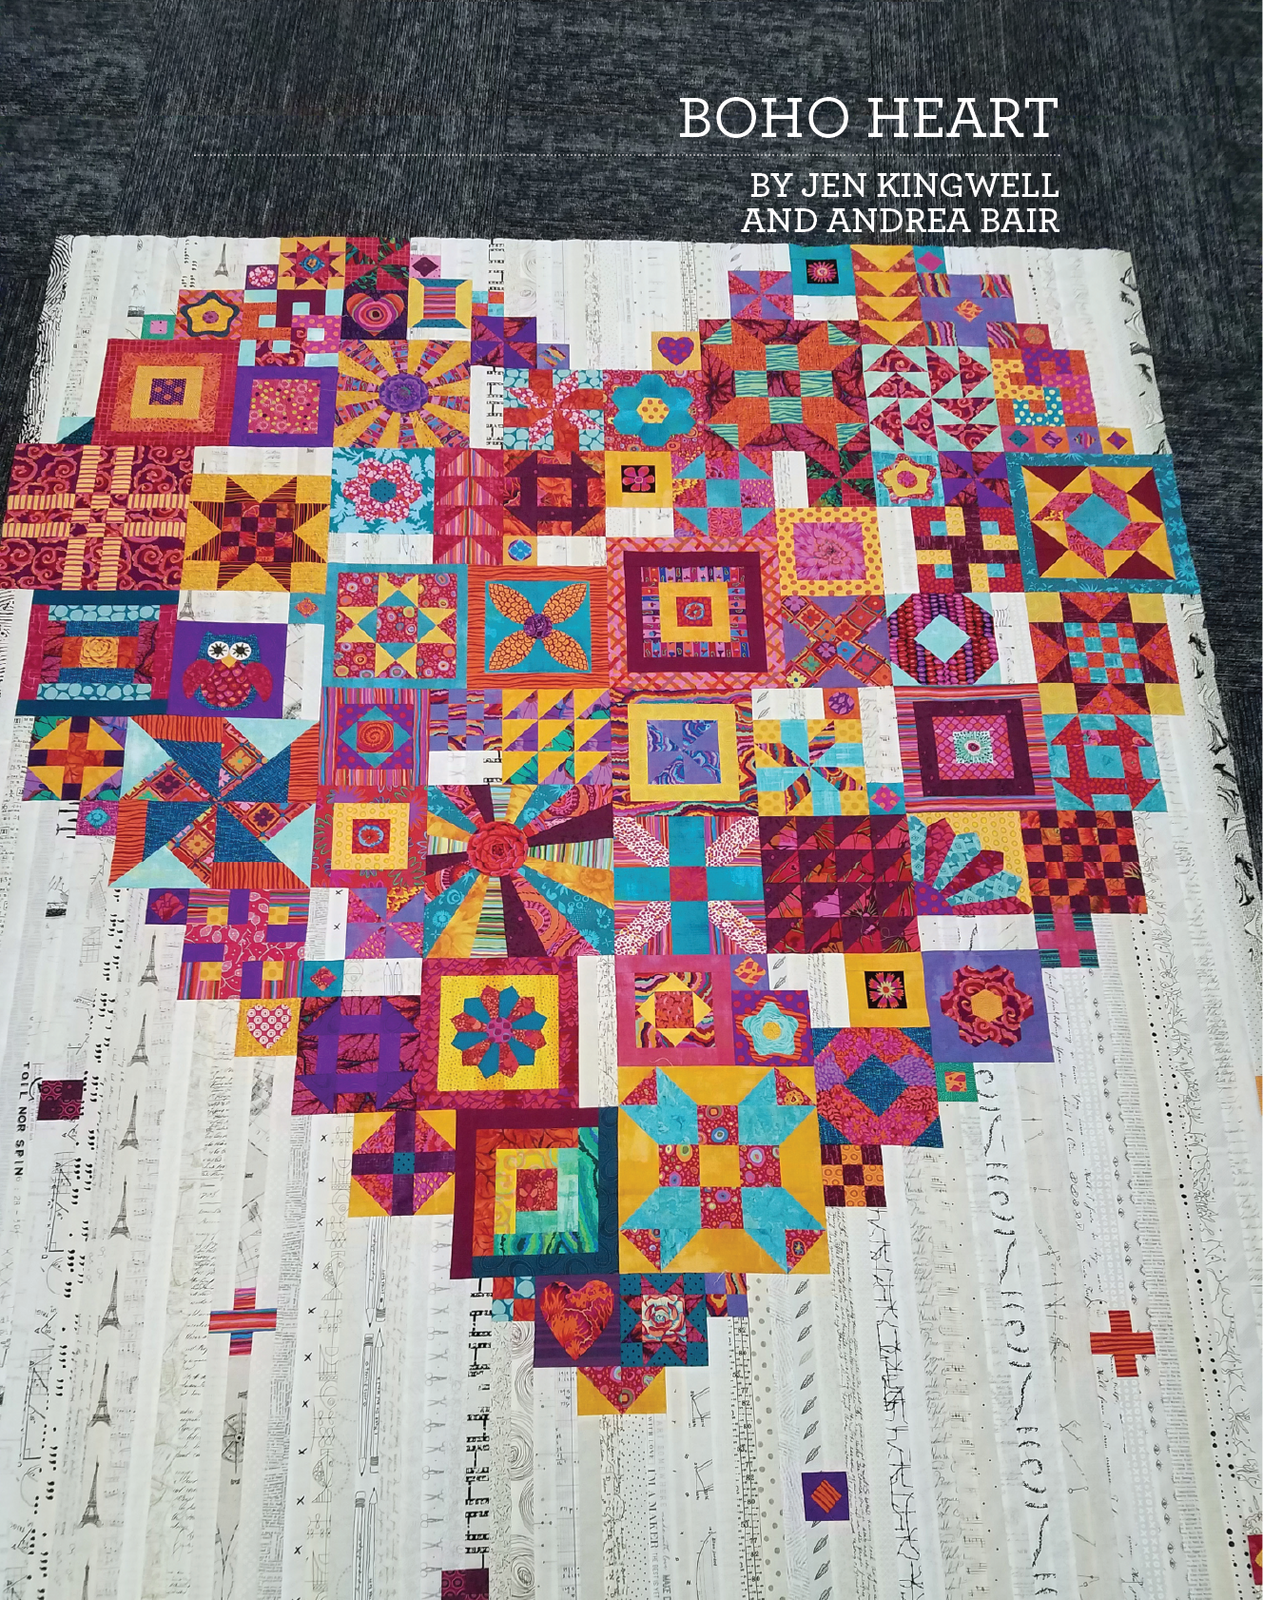

If you're interested in making the official version, the pattern is now available in many shops. A quick search should pull up a number of purchasing options.

Tuesday, January 1, 2019

Christmas 2018 finishes


Happy New Year! Everyone still has all their Christmas decorations up, right? Good, because I'm sharing my holiday finishes today.


For the first time in many years, we got on an airplane during the dreaded winter holiday travel season. But the reward for enduring crowded flights filled with sneezing travelers was getting to visit family and friends. I decided to make zipper pouches to give to the folks we were visiting. Nothing big, just small tokens of affection. It was fun to select fabric for each person and quilt up the bags. Sewing with zippers is definitely not my favorite thing, but I feel like I'm getting the hang of it now.


I added a few little suprises inside the bags. This one for my Dad has beer fabrics peeking through the zipper.


This horse bag was given to my Mom, and has music notes inside. She and her husband both sing in choirs, so I put the same fun fabric inside his gift.


A dear friend lost her beautiful tuxedo kitty a few months ago, so I made her a bag with holiday kitties to cheer her up. The little paw prints inside honor the prints our pets leave forever on our hearts.


And speaking of cats, I made this little holiday wall hanging for above our bed. It uses six panels of Debbie Hron fabric. 


The little contented Christmas cats have such sweet faces! The central square is all part of the panel, and I added borders to make a star shape.


My husband really likes this paisley print, so I used up all my scraps of it. The quilting is simple stipples in the borders, SITD around the stars and squares, and outlining of each cat.


The reason I needed a new wall hanging is because this is the first year we've had a Christmas quilt on our bed! Sorry for all the dark photos, but our bedroom is incredibly dark. Our windows are only 8"x18" and the walls are dark wood. Great for sleeping, but lousy for quilt photos.


The wall above the bed usually holds my Postcards from Ikea piece, which is rainbow bright. It didn't look right with Christmas red and green, so Contented Christmas Cats chased a squirrel (or maybe vice versa?) and a more coordinated look was born.


The bed quilt was actually finished months ago during Christmas in July, and put away until December. The flimsy dates back a whole year. I quilted the scrappy cream background with big feathers, and the darker red and green areas with a stipple.


The binding is a black and white stripe, and the quilting in the red border is simple straight lines. After all those feathers, I was kinda done with the quilting to be honest. I should probably do borders first before I run out of steam.


The back is solid green fleece, and I used no batting in this piece. We are usually somewhere warm for the winter, so this weight is just right for us.


The fleece shows the shape of quilting really, really well. But it completely hides the individual stitches. The bobbin thread is off white, and you can't see any white at all on the back! Gotta love that thick, forgiving fleece. 

When we return to the boat this week, it will be time to pack up and put away our Christmas decor until next year. Meanwhile, we're enjoying everyone else's holiday lights and trees. I hope you all had a wonderful season. Onward to 2019!


Saturday, June 2, 2018

A whole family of squirrels


It's time again to link up our DrEAMis/Squirrels with Sandra. Even though I don't usually have an agenda for what I sew on any given day, there are definitely projects that feel like DrEAMIs, where I Drop Everything And Make It. This stained glass looking top falls squarely in that category. I recently had pulled out this jelly roll of Nicey Jane fabrics because it was taking up awkward space in a box. Then Vicki and I were having a conversation about jelly roll patterns and as I browsed through my folder of free patterns, this Moda Bakeshop one called Noteworthy Labyrinth grabbed my attention. A little modification to the pattern and three days of concentrated sewing later, I had this top. 


There were a lot of different steps in the Bakeshop pattern and I felt like I could use a leader/ender project to go along with it. Mister Domestic had posted a fun quilt made with striped knit fabrics so I decided to make something similar. These are just simple 5.5" squares of various stripes, sewn into a basketweave design. It used up some scrappy stripey pieces that were too small to use as bindings. About 80% of the piecing was finished as leaders/enders by the time the jelly roll top was done, so it was practically a two-fer-one deal! Kind of a baby squirrel.
 

While I was selecting, ironing, and cutting my striped fabrics, I kept picking up and moving my box of dog-themed fabrics. That darn dog box was just constantly in the way! Only one thing to do about that: open it, pull some fabrics, and make 20 Mendota blocks with pooches, pups, and pugs. This one is destined for Wrap a Smile, and I've named it Squirrel Chases Dog. Another baby rodent skittering around my studio, tamed and tethered.


But wait! There's more! More dog fabrics, I mean. After using up most of the red, blue and brown dogs, there was a nice stack of greenish canine fabrics left over. I pulled a few green blenders and did a quick-n-dirty on-point layout. I don't love this one, but it was useful to figure out exactly what size blocks to cut to end up with the 40"x50" size Wrap A Smile prefers. This was my first test piece to get the 4/5 proportions correct. Next time I'll cut slightly smaller blocks and add a border to contain all the bias edges and give it more finished feel. Once I started thinking about the quilty math, my brain wouldn't stop chasing that nut hoarder. So this is little baby squirrel number three!


And finally, when Val announced her new Eye-Spy fabric swap, I just knew I had to participate. It's no secret that I love (and hoard) kid-friendly novelty fabrics. So I had plenty on hand to cut into the required 4" squares. To be part of the swap, you send in 20 squares each of 10 fabrics. Val collects them all, then redistributes them to all the participants and you get 200 unique squares back. So fun! There's an option to send in two sets and get 400 back, so I signed up for that in 5 seconds flat. Honestly? I could have easily pulled 40 unique novelties to swap, but Val is an elementary school teacher and knows how to make it fair for everyone. (Don't be piggy, Louise!) The selecting, ironing, and cutting took about 2 hours for little baby squirrel number 4. I think that counts as a whole litter of squirrel pups!

Sunday, February 4, 2018

Sweet DREAMIs!


DREAMI, if you don't know, stands for DRop Everything And Make It! Also known as a quilting squirrel, it's a project that you just can't resist and have to make RIGHT NOW.


This week I learned about another neat charity, called A Doll Like Me. Amy sews soft, sweet dolls that share a physical disability with their young owner. It might be a scar, a birthmark, or a missing limb. It might be a bald doll for a tiny chemo patient. As a pediatric nurse, Amy sees how powerful and healing it is for children to love dolls that look like themselves. 


Bernie at Needle and Foot put out a call for quilters to make some tiny quilts to go with these amazing dolls, and I just couldn't resist stitching up these three. I had some left over blocks from one of my first Project Linus quilts. I thought the bright, happy jungle animals might bring a smile.


At around 20"x24" each, these little pieces stitched up super fast and I was able to make them all in a single day. I quilted them with a quick stipple and bound them all in the same blue stripe. 

I have a niece who had open heart surgery as a baby. When she was a little girl, she struggled with the large scar on her upper chest, always worrying that she looked "different." These quilts were made in her honor.


Making them was definitely a SQUIRREL! moment, so I'm calling them Kit 1, Kit 2, and Kit 3, since baby squirrels are called kits. I tested Kit 2 on Big Daddy, who rides on my husband's scooter. A perfect fit!


My scooter has a bear, too, named Eddy Jr. He's has been out in the rain for a while, his fur is starting to shed, and he's got a thin layer of road grime on him. He doesn't mind, but I didn't want to muss up the quilt. Big Daddy and the scooter he rides are both brand new and very clean, because they replace a bike and bear that were stolen from us mere weeks ago. That is a sad and sordid tale that I'll leave for another time, but you might notice the big cable lock around both front tires. We are sadder, wiser and more paranoid now.

Saturday, November 25, 2017

Splash of Color QAL


I don't normally do quilt alongs (QALs) for a couple of reasons. First of all, I'm impatient. If I like a quilt, I want to keep working on it. Making a few blocks and then setting it aside for the next step in several weeks makes my teeth itch. Secondly, I'm squeezed for space and don't have much room to have something in progress like that. And third, I'm ornery and chafe against anyone else's schedule.

So when I saw several folks making black and white quilts for the Splash of Color QAL over at Myra's Busy Hands, I thought, "Oh, lots of pretty quilt ideas, but I don't do QALs." End of thoughts.


Except those thoughts didn't go away. I kept looking at my small stash of black and white fabrics and thinking, "Hm, someday." And I had this cute, lurid panel of cats that I had already cut apart and all the pieces were floating around and getting in my way. And I noticed that among the EXTREMELY BRIGHT orange, pink, blue and green cats were touches of black and white. Hm. And while looking for a pattern to use with some woven plaids and stripes, I stumbled across this free pattern called "Juxtaposition." And suddenly I wanted to make those rectangular blocks in black and white with a vertical stripe of brights, and surround the cats with them.


So yesterday, I did. It wasn't so much as a quilt along (QAL), as a quilt all at once (QAAO.) Pretty squirrelly. And I'll admit that my "splash" of color is, um, rather large. Like the kind of splash that a kid makes jumping off the diving board and yelling, "Cannonball!" So I'm calling this piece Cat Cannonball. I also tried a new technique, adding a small flange of black around the panel pieces to set them off a bit. We'll see how that works out during the quilting.


In other, but also lurid, news, Weirdly Whimsical is washed and crinkly. 


I'm happy to report that the linen pieces on the front are nice and soft and shrank at about the same rate as the cottons. This was also the first time I washed the donated yellow plaid backing and it also did really well in the crinkly softness department.


And lastly, the Home Depot Quilt is an unwashed finish.


All the fabrics are bricks and stones and it looks like the outdoor paving department at Home Depot to me. I quilted it with my walking foot in straight lines that parallel the black "pathways." The binding is the same black fabric with a tiny dark gray spot.


The backing is another piece of the fabric that was donated by Sean's aunt. It's not quite as bright red as this photo shows, but more of a brick red that looks great with the front. The sun was very low in these pictures, casting a golden glow on everything. This quilt doesn't have a home yet and keeps whispering gently in my ear that I should hold onto it for a while. 


We've been in Jacksonville for about a week now, and are now getting ready to continue heading south. We anchored in the river for the first couple of nights, and it was very peaceful and calm for being right downtown.


Saturday, October 21, 2017

Squirrel video and a small finish


I have a new favorite YouTube quilting video channel: Jordan Fabrics from Grants Pass, OR. Donna Jordan gives really clear instructions for some nice patterns, and doesn't do a hard sell of their products. The camera angles are good and I've been learning quite a bit by watching her techniques.

The video linked above, for the pattern "Teatime" gave me a total SQUIRREL! moment, though. She makes the green quilt using 40 green batik 2.5" strips and the technique is fast and fun. My brain said, "Hey! I could do that with scrappy 2.5" strips!" and I was off and running.


I had the equivalent of about 40 strips in my "rainbow bright" scrap box. These are fabrics that are too multi-color to fit into any single color category. Most of them are not full width of fabric, so I just sewed shorter pieces together until each strip was about 40-42" long. (You can see two of our boat radios in the background of this photo. I listen to marine radio traffic all day.)


Following the video (which you should watch for full details about how to finger press to make everything easier), I sewed together five strips. You can see my pieced strips here: stripes sewn end to end with cupcakes, several Kaffe fabrics in the bottom row, etc.


Then each set of five is sewn back together into a tube, so the middle strip is now folded along the bottom.


Press the tube carefully so that bottom fold doesn't get creased but the seams are flat.


Cut into triangles. Donna uses a special ruler for this, but I just marked a regular square with some tape for guidance.


Open up the triangles and admire straight, square, scrappy, strippy blocks made without foundations. Half the blocks have the carefully folded center strip in the middle (bottom row) and half have the last seam of the tube in the middle (top row.) The latter just needs to have that final seam pressed flat.


Because of the two different styles of blocks, if you lay the quilt out by alternating the blocks, there are ZERO strip seams to match. No foundations? No seam matching? This is a total winner of a block for this lazy quilter!


And speaking of lazy, this little finish required no seam matching, either. In fact, there isn't a single seam in the entire quilt except for the binding! The cute panel is wide enough that it makes a nice size baby quilt all on its own. It's about 36"x42" of bright, happy animals and the fabric is very soft and smooth.


My current set up with the sewing machine in the salon/living room doesn't have a nice supportive area to the left of the Juki, so I wanted something really small to maneuver in the space available. I kept the quilting super simple, just outlining the sweet animal shapes and the border.


The wind helpfully flipped the little quilt up so you can see the back in coordinating fabric. A nice stripey binding finished it off easily and now this fun baby quilt is ready for Project Linus.