Monday, October 23, 2017

Bricks and stones


I'm piece piece piecing away here. A couple days ago I finished this relatively fast flimsy. It's a free pattern from Timeless Treasures called "Marvelous Maze" by Osie Lebowitz and is part of their Broome Street Patterns collection.

There are lots of free patterns put out by the fabric manufacturers, which makes sense. It's in their best interests to make it look fun and easy to use their fabrics and nothing shows off a new line like seeing the designs working together in a quilt. At least that's the theory. Very few of the free patterns appeal to my eye, so when one does, I download it and save it for later. Since the patterns feature a particular fabric line, the older ones tend to disappear. If you can't find one that I've used, feel free to ask me for a PDF copy. Passing it along to another quilter for personal use doesn't violate the usage agreement on most of them.


Back to this one, which I've named Bricks and Stones. All the fabrics are prints of bricks and stones, except one that I think it supposed to be leather but looks quite a bit like stones to me. The blocks are really simple, just a square with the accent color sashed at a 45 degree angle across opposite corners. They can then be laid out in a wide variety of settings, including kind of randomly which then looks a bit like a maze. I kept thinking about wandering through Home Depot's outdoor paving section while I pieced this.

I did a quick layout on the design bed, mostly to get the lights and darks scattered nicely across the quilt. I then carefully stacked each row and column and carried them upstairs to sew. After stitching all the pairs and taking them to the ironing board, I discovered that my matching of all those sharply contrasting black accent angles was, um, really lousy. And then I discovered that these fabric, which were someone else's scraps bought on eBay, were really el cheapo low quality fabrics that stitched fine, but whined and complained when I ripped a bunch of seams out. Oh, wait, maybe that was me whining and complaining. And squinting since I used black thread on black fabric. Ugh.

Somewhere in all the ripping and whining, I lost track of my initial design layout since the rows weren't labeled. Eh, it was fairly random anyway, so I soldiered on. When I got the finished flimsy hanging up for a few photos, I realized that my lights were a bit clumped together, but decided I could live with that.

Then, I noticed that my random placement resulted in a giant swastika in the middle of the quilt. ARGH!! Once seen, it couldn't be unseen! No, I didn't take a photo. Fortunately, I realized that I only had to rotate a single block 90 degrees to fix that, although (of course) that single block was right in the middle. And that single block was (of course) the el cheapiest of el cheapo fabrics that practically shredded under the seam ripper. But I got that sucker ripped out and turned and all's well that ends well.


I certainly learned my lesson about keeping better track of my rows and columns! So the project I'm working on now, the strippy scrappy rainbow blocks, was handled differently. I put pins in the first block of each row: one pin for row one, two pins for row two, etc. I was so proud of myself until I sewed row two to row three...yes, that's one of row three's pin heads sewn right into the seam. The Juki punched through the plastic flower head pin like it was butter and didn't even hesitate. Oof.


Fortunately, the stitch length was short enough that it basically perforated the pin head so I was able to pull it out of the seam easily. Now I'm looking for other ideas for marking rows and columns. What method do you use?

Saturday, October 21, 2017

Squirrel video and a small finish


I have a new favorite YouTube quilting video channel: Jordan Fabrics from Grants Pass, OR. Donna Jordan gives really clear instructions for some nice patterns, and doesn't do a hard sell of their products. The camera angles are good and I've been learning quite a bit by watching her techniques.

The video linked above, for the pattern "Teatime" gave me a total SQUIRREL! moment, though. She makes the green quilt using 40 green batik 2.5" strips and the technique is fast and fun. My brain said, "Hey! I could do that with scrappy 2.5" strips!" and I was off and running.


I had the equivalent of about 40 strips in my "rainbow bright" scrap box. These are fabrics that are too multi-color to fit into any single color category. Most of them are not full width of fabric, so I just sewed shorter pieces together until each strip was about 40-42" long. (You can see two of our boat radios in the background of this photo. I listen to marine radio traffic all day.)


Following the video (which you should watch for full details about how to finger press to make everything easier), I sewed together five strips. You can see my pieced strips here: stripes sewn end to end with cupcakes, several Kaffe fabrics in the bottom row, etc.


Then each set of five is sewn back together into a tube, so the middle strip is now folded along the bottom.


Press the tube carefully so that bottom fold doesn't get creased but the seams are flat.


Cut into triangles. Donna uses a special ruler for this, but I just marked a regular square with some tape for guidance.


Open up the triangles and admire straight, square, scrappy, strippy blocks made without foundations. Half the blocks have the carefully folded center strip in the middle (bottom row) and half have the last seam of the tube in the middle (top row.) The latter just needs to have that final seam pressed flat.


Because of the two different styles of blocks, if you lay the quilt out by alternating the blocks, there are ZERO strip seams to match. No foundations? No seam matching? This is a total winner of a block for this lazy quilter!


And speaking of lazy, this little finish required no seam matching, either. In fact, there isn't a single seam in the entire quilt except for the binding! The cute panel is wide enough that it makes a nice size baby quilt all on its own. It's about 36"x42" of bright, happy animals and the fabric is very soft and smooth.


My current set up with the sewing machine in the salon/living room doesn't have a nice supportive area to the left of the Juki, so I wanted something really small to maneuver in the space available. I kept the quilting super simple, just outlining the sweet animal shapes and the border.


The wind helpfully flipped the little quilt up so you can see the back in coordinating fabric. A nice stripey binding finished it off easily and now this fun baby quilt is ready for Project Linus.


Monday, October 16, 2017

Moon Pies Over Charleston and more


Last week I finished this little wall hanging, called Moon Pies Over Charleston. It has been donated to the charity fundraiser auction for the Charleston Unitarian Church, which is celebrating its 200th anniversary. It is also the 100th anniversary of Moon Pie snack cakes and of course the full solar eclipse happened here, so the auction committee chose a moon-y theme.


Well, who can resist a theme like that, when one has the PERFECT fabric in one's stash?? Here's a shot in the brighter sun that shows how pretty the fabric is. The suns and moons are from a Dan Morris panel. I just added a few borders and some minimal quilting.


This panel only shows a partial eclipse, but the sun face is so pretty. Each panel has nice metallic accents and lots of true blues.


Mostly I did stitch in the ditch and outlined a few key features of each moon and sun face, then a quick stipple in the border.


For the flanged binding, I used a gold metallic swirl for the inside and more blue for the outside.


The backing is another mottled blue, and I put simple triangular corners to hold a dowel for hanging. Ha, I just realized the triangles are under my big clips so they don't show in the photo! The piece could also be used as a table topper. 

I've temporarily joined the choir at this church, just until we leave Charleston in another few weeks. They've welcomed me with open arms, so donating a little piece seems like a nice way to give back. I brought the quilt with me this Sunday and met another quilter who said, "Oh, I'm so glad you made that! Now I don't have to make a themed quilt this year!" I guess she's been donating similar items each year and is glad to have a break.


In other news, I pieced up this flimsy using Cloud 9's "Ribbon Box" free pattern and some of the fabric donated to Covered in Love


After cutting all the fabrics, the pattern sews up pretty quickly in rows. I started with the top row, which has a few of the "ribbon" tails.


Then I did the bottom row...uh, that can't be right.  Riiiiiiip!


The fabric line is called "Cool Cats" by Henry Glass, and features these funny felines. I cut apart a panel and stitched the cat blocks into ribbons for this top. Now I'm waiting to buy some coordinating Aurifil thread before I baste this one up and quilt it. It will be fun to do different FMQ motifs in each color: purple, blue, yellow, green, pink, red. Such a bright, cheerful line!


I leave you with this charming photo of a black plastic garbage back full of tiny scraps. Usually I sew up some dog beds and stuff them with this, but I just wanted it off the boat last week. So I listed it on FreeCycle and gave it away to a Girl Scout leader who will use it in a craft project for the troop. The girls will sew up cushions to sit on at the rest of their meetings this year and use this as stuffing. They will also learn about FreeCycle*, so it's a win-win!

*FreeCycle is a community bulletin board where you can list anything you have to give away for free. It's great for giving away the kinds of things that a charity shop won't accept, like partially used pieces of lumber or cardboard boxes, older electronics/appliances, even food. Members can also request items to be donated. It keeps things out of the landfill and clutter out of the boat, so I sign up for FreeCycle in most cities we pass through.

Monday, October 9, 2017

Scrapception and purge sewing


Yesterday's scrappy strippy triangle quilt top generated quite a number of subscraps. You know, those even scrappier scraps leftover from when you cut bits off your scrappy project? Well, I was determined not to keep the subscraps. Scraps get only get once chance here! So I pieced all the little bits into slabs and combined them with the cut off ends of the triangles.


Then I cut the chunks into random rectangles, bordered them with bright red, and set them in a yard of gray linen. It ended up being about 42"x42", a good baby quilt size. Kind of odd colors for a baby, but it has a very modern vibe and some young mom might like that.


The photo above has the flimsy hanging in front of a translucent blind, so I tossed it over our little round outdoor table to get a better photo of the true colors. Boy, that linen really attracts the lint! I'm not cleaning that up until I go to quilt it, someday. Since this top was made from scraps of scraps, I'm calling it Scrapception.


I cropped this out of the first photo, but realized that this scrappy quilt just happens to be the same colors as our trio of boat paintings. 

The purge quilting part of this blog post was getting rid of that gray linen. I've experimented with several types of fabric besides quilting cotton: silk, flannel, linen, corduroy and seersucker. Each one is interesting, but I don't particularly want to mix and match them in my quilts. And I simply don't have the room to store stashes of different types, so I'm purging the odd stuff.


This little quilt is also purely for purging purposes. All the green fabrics are more linen and I just wanted them gone gone gone. The greens matched this weird whimsical panel that I also wanted out of my life, so I took that as a sign to put them together. I like each block, but I can't wrap my head around why the panel included spaceships, mermaids and random animals. Somebody's own made up creation story? I don't know and I don't like it. I want my whimsy to have a consistent story line, apparently.


Here it is in the natural sunlight. The colors are very vibrant. The size is just under 36"x42" so it will only need a single yard for backing, and I have one yard of hot pink linen. Soon to be gone! I'll use a black and white stripe for the binding to pick up the inner printed borders on the panel.


The center stripe on Weirdly Whimsical (I guess that's what I'll call it) quilt, was a single strip scrap that came with this long quarter bundle of pretty homespun stripes and plaids. The pieces were clearly washed and are quite frayed, which must have frustrated the eBay seller, because I paid less than $1/yard for this. Sweet! No purging of this batch; I'm looking for a nice pattern to do it justice.

Sunday, October 8, 2017

Scrap, scrap, scrappin' along


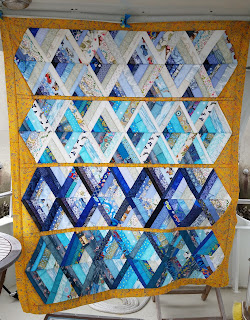
After finishing up several gift quilts lately, I decided to just play in my scraps for a while. My blue/aqua box of scrap strips was overflowing, so that was a good place to start. I was inspired by a couple quilts I saw on Pinterest to make some 60 degree string triangles.


I raided my "light neutrals" scrap box, too, and made strip sets going from light to dark. Each set is about 9" wide and about 40-45". I had a few single pieces that were WOF, but most of the strips were pieced end to end in similar color and value as you can see. 


I read somewhere that your strip piecing will stay much straighter if you press the seams open instead of to one side. That was definitely true with these random, leftover scrap strips. Here's two sewn together. Note that big bow in the piecing.


After setting the seam then pressing it open, the bow completely disappeared. Magic, huh? Please excuse my well-used and rather scorched ironing board cover. I love that bird print, but it needs to be retired soon. 


After making the strip sets, I trimmed them all to 8.5" width and started cutting triangles. 8.5" is the maximum size I can cut with this ruler. I'm lazy, and wanted to cut and piece as few triangles as possible. Because the sets ended up all chopped up, having pieced strips was no big deal. You can see in this photo that half the triangles have a dark base, and half have a light base. I also ended up with those right angle triangle end pieces, which I saved.


I tried to keep the true blues and the aquas in separate strip sets, and ended up with four distinct sets of triangles. Completely by accident, the aqua strips had less white/cream, so they read as more uniformly colored than the true blues and the true blues have a more distinct pattern of light and dark.


I wanted to sash between each of the four sections and decided to go bold. GOLD bold! I've admired a number of scrappy quilts lately that have very patterned, brightly colored backgrounds. I pulled out an oddball dark yellow/gold with a red and blue paisley motif, and it spoke to me. It whispered, "Yo, Louise, it's a completely scrappy quilt! That's like completely free fabric right there, so try something new, why doncha? Who cares that might look like a circus tent when you're done? Don't be such a wuss. What have you got to lose?" Not exactly reassuring words, but when the fabric speaks, you gotta listen.


Here is that gold at the end of two rows, filling in the space at the end of the triangles. I only had a yard of it, so my sashing and borders needed to be skinny minnie to make it work. 


And here's the finished flimsy. The gold is kinda weird, but a good weird, I think. The triangles have a nice 3-D effect. There are lot of fun bits of fabric in there: cats, butterflies, hearts, birds and fish to name a few. It's pretty big for me, about 60"x70", which makes a nice couch or lap quilt size. Still, a bit more width in the sashing would have been nice.

Have you ever used a really off the wall fabric for background or sashing? Did you hem and haw about it first, or dive right in? Did it whisper to you, and if so, did it have a New Jersey accent? Weird.

Friday, October 6, 2017

Gift reveals


Good morning, quilting friends and family! It's a beautiful day in Charleston and even though I'm really missing DH Sean, I'm cheered by the warm responses I've gotten from a few gifts.

Aren't newly weds B&K cute? I made them the mariner's compass star block pillow after they said they both really like blue. I'm really glad they sent a photo, because I completely forgot to take any before I shipped it out. Tsk. B&K were married a few months ago, and B is also starting medical school. In order to keep up with his studies, they only opened a few wedding gifts a day. Such discipline! He can prop his anatomy book up on the pillow, or nap on the couch in exhaustion with it. Pillows are useful that way.


And speaking of the color blue, our friends here in the marina like it so well they named their boat after it.


You saw the flimsy for this quilt a few weeks ago, and now it's finished, gifted, received and appreciated. It was made for Sean's aunt, who is having some health issues. I decided to name it Graceful, which goes nicely with her name, her personality, and the elegant kaleidoscope pattern.


I did FMQ figure eights in the long white sections, and smaller loop de loops in the white triangles. This makes the patterned fabrics and the secondary circle motif really stand out. The fabrics are Moda Regent Street lawns, very fine and soft.


In the plain cornerstones, I quilted four hearts and did a different fill on each one. Sean's aunt is very dear to me, so I wanted to send this subtle love note. The binding is dark blue, to offset some of the pink in the borders. 


The borders got their own FMQ motifs: wider figure eights, ribbon candy, and parallel lines.


The back is most of the leftover pieces of lawn and border fabrics plus some lighter shirting material to make it big enough.


Here is Graceful on the back of our boat, Vector. Vector isn't very graceful and isn't painted blue. (A boat broker once told us there are only two colors to paint a boat: white and stupid. We choose a lighter shade of stupid than navy blue.) She's a sturdy little ship, but not swoopy and elegant like the go-fast boat in the background. We're surrounded now by huge, exotic yachts and often feel like the one person dressed in overalls at a black tie affair.


Sean's aunt really liked her quilt, so I'm happy. Sean arrived safely in St. Thomas and has relatively comfortable lodging (on a Navy ship, no less) so that's good news, too. There's tons of work for him, and he has been able to either text or call me each day. I'll post semi-regular updates about him on our travel blog. He wrote in his last post that I would update here, but it makes more sense to just use his blog, since his readers are not quilters. 

Linking up with Can I Get a Whoop Whoop this week.