Friday, December 23, 2016

Holiday decor


I finished this funky table runner last week and finally got it washed now that we're in a marina with plenty of water for the washing machine. It needed to shrink just a smidge to fit fully within the fiddles (edges) of our dining table. 


Here's the back, a fun ornament fabric fattened up with a bright tonal green poinsettia blender. I actually pieced this runner two years ago and used it to test an alternative batting idea. I used a piece of white fleece in the sandwich and then did quite a bit of FMQ before I discovered that the back had shifted significantly. It was a Festive Holiday Medley of Giant Puckers on the back, and I had a Festive Holiday Medley of Cursing when I realized how much ripping I'd need to do. Lesson learned: fleece is waaaaaay too slippery to use as batting. I chucked the whole thing in a corner until I rediscovered this summer. At that point, I was more in a rippy mood (do you ever get that way? when stitch ripping actually is kinda fun?) I ripped and ironed and re-basted and tucked away again until I was ready for some walking foot quilting and here we are today. It's not my best work, but it's great as a table runner/cloth because it hides a multitude of dinner splotches and spills.

A few more photos of our holiday boat decor:


Aft port corner of the saloon with "Trim the Tall Tree" paper pieced wall hanging made by me in 2014, and ceramic tree made by Sean's grandmother many many years ago. The breakable tree can only be out if we're in a marina where the boat doesn't move much.


Pillow cover made with this perfectly nautical little panel of a Christmas tree in a red row boat. Stitched up last year.


Artificial garland with multi color lights, hanging from the ceiling hand rail that runs down the middle of the saloon. It's well secured and out of the way, so it stays up in all sorts of sea conditions. It is amazingly lifelike, right down to shedding needles every time you look at it cross-eyed.


The garland is decorated with unbreakable small shiny balls and birds, like this green sequinned hummingbird. I like how they seem to flutter through the branches above my head.
 

This peacock is made with real feathers, and peers down from his garlandy perch. See his tail?


This is my last post before Christmas (and it was actually written last week.) We have guests aboard all this week and I've had to dismantle my quilting studio in order to turn it back into the guest stateroom. This sad photo is my Juki, all bundled up and ready to head off to the spa for routine maintenance. That way it will be out from underfoot and then clean and shiny for sewing in the new year.

Immediately after our guests leave, we will be driving to my brother's house in Houston where my entire family is gathering this year. It's the first, and possibly only, time we'll all be together, so it's worth the long drive with the cat in a rental car. The big family party will include my Mom, Dad, Stepmom, brother, sister in law, all of my adult neices, nephews, their partners and my one and only grand nephew. He just celebrated his first birthday and we'll be meeting him for the very first time.


Whatever holiday you celebrate in the coming weeks--Christmas, Hanukkah, Winter Solstice, or just a few days off work--may quilts, peace and laughter find you here in the shortest days of the year. Thank you for joining me on my quilting odyssey; your presence and kind comments make me happy!

Wednesday, December 21, 2016

Gift placemats


My nephew Andrew is getting married in the spring, hooray! As an engagement gift, I made a set of quilted placemats. I heard through the grapevine that their kitchen decor was going to be black, white and gray. I also heard that niece-in-law-to-be Sarah's favorite color is teal.


So I made scrappy little pieces in two variations, each with a touch of teal. Each placemat also has a different walking foot quilting design. One piecing variation has the scraps in the center with white background edges, running across the short side of the mat. This one has overlapping spiral quilting.


The other variation has the scraps on the edges with the white pieces in the center, running the long direction. This one has my new favorite standard quilting motif: wavy lines inside straight lines. How's that for a catchy name? Hm, a bit unwieldy. How about Straight 'n Wavy?


This radiating lines quilting motif is fun to do and gives a nice sort of sunrise effect. I learned this in Jacquie Gering's Craftsy class.


This quilting is a bit hard to describe. I found it in Angela Walters Shape by Shape book. It starts in one corner and goes in a straight line to two inches beyond the second corner, then to two inches beyond the third corner. This pattern repeats and the line spirals inward. I'm sure there's a name for this mathematical pattern; anyone know what it might be?


The back of each placemat is this busy black and white print, and the binding is a black and white stripe. I figure if they have kids, this side will really hide the stains. That little navy blue bit in the upper left corner is the older design of my premade labels. All the fabrics were already in my stash, so these were fun and shopping-free pieces. Hope they like them!

Monday, December 19, 2016

A gift quilt for cuddling


This gift quilt is finished and ready to be sent off to its new family home. I'm almost certain the recipients don't read my blog, but I'll be cagey about any more details just in case they do. For instance, the name of this quilt is a big hint about who it is for.


The pattern is called "Natural Beauty" and it was designed by Lori Mason. The focal fabrics are from a line by Makower UK called "Kimono." This is a adult lap size, about 61" square.


Kimono features gold, red and green Asian-inspired motifs like paper umbrellas, chrysanthemums, lanterns and um, kimonos. I added blacks, creams, reds and tans from my stash to make it a bit scrappy. I used a phone app that translates Kanji characters to scan some of the fabric. I wanted to make sure it didn't say anything weird in a language I don't understand! (If you're wondering, the Kanji seemed to be a list of addresses like 123 Main Street.)


To quilt this piece, I used my walking foot to sew diagonal lines about three inches apart. Then I did free motion quilting in those diagonal columns, using four different motifs.


I wanted there to be a nice variety of shapes in the quilting, so I chose loop-de-loops, a funky sort of fleur-di-lis, a simple Greek key, and ribbon candy. It shows up really nicely on the rather plain backing.


On the front, the quilting mostly blends in, letting the pretty fabrics take center stage. This is my favorite block; something about that sweet twiggy cream is just so appealing! You can see the stripe I used for the binding, which was sewn on the back first then flipped to the front and edge stitched by machine.


These are my new labels, which are bigger than my last set. They are a shiny synthetic (acetate?) that's quite hard to photograph.


They are large enough for writing on both sides of the fold, so I added washing and use instructions. That third line is what we quilters really want: use it often!

Saturday, December 10, 2016

Christmas crafting


It's beginning to look a little like Christmas around here. We got as far as pulling out our pre-lit wreath and garland and putting them up, but I haven't put the ornaments on either one, yet. Our Christmas tree is made of ceramic, and the river has been turbulent enough that we decided to leave the tree in its protective bubble wrap until we get to New Orleans.


I have done a bit of holiday quilting, though. I made this little piece with leftover HSTs from a quilt I made for my Mom two years ago, and last week I finally quilted it and stitched it up into a pillow. I did dot-to-dot quilting in the white, mostly triangular spaces.


I was just going to use a simple piece of seasonal fabric on the back, but instead I put together another quilted square. The center kitty is from a panel, and it coordinates with some of the fabric I used in Jeri's Cats of Hope quilt. Simple straight lines in the borders, and a quick outline of the center cat. I'm calling this technique "fussy quilting." Like fussy cutting, but with FMQ!


It also coordinates with the leaping cat fabric used in the border of this quilt. This is one of my early quilts, when I knew almost nothing about how quilting fabric is usually part of a larger line. 


Now I know that if I find something I like, I should try to find out the name of the line because I'll probably enjoy the other matching pieces.


The odd quilting design on that navy cat border was actually sewn from the back, where I fussy quilted some these sweet tuxedo cats wearing Santa hats. This kitty looks like our best cat ever, our girl George. We lost her just two months before Christmas in 2014, and I sewed this quilt while grieving. Concentrating on stitching around every little detail of those hats and scarves and tails was actually therapeutic. 


The pattern for George's Christmas Quilt is interesting. The charm squares are sewn into a 6 x 12 grid, then sliced with a couple of diagonal cuts and sewn back together. The end result is a square with the charms on point. Add a couple of borders and you're done. It's tricky to get the charms distributed properly, so I have a few that ended up in the wrong place, but I still love this quilt. And with the low temperatures we've been having, it's been perfect to have on my lap in the pilot house. 


This quilt, called Christmas Vomit for its loud and exuberant scrappiness, was mostly finished last Christmas. I had done simple straight line quilting along each of the straight seams, and it made pretty star shapes on the back. Unfortunately, that left too much unquilted space in the big hexagons, so the fabric was a bit poofy and saggy. But after the holidays, I wasn't motivated to work on poinsettia fabrics anymore.


This year I went back and fussy quilted at least one motif in each hexagon, which really helped bond all the layers properly. The chickadee and pine cones are outlined in this block.


Here you can see on the back how I chose one pear to outline. You can also see the original straight line quilting. So now I'm calling this one completely finished, too, and it's been my lap quilt in the salon. Angel has even been lying on top of it on my lap, which is unheard of for her!

Friday, December 2, 2016

Boat basting


It took me a while to figure out the best way to baste quilts on the boat, and I thought I'd share that process on today's post.  We only have two rectangular tables, and both are quite small. The one in the salon has fiddles, which is a raised lip all the way around to keep items from sliding off as the boat rocks. Unless the quilt is smaller than 20"x44", the fiddles keep the quilt from laying flat.

The table in my studio, which is about 24"x48" is a better size and has a flat top. But it's wedged on top of the guest bed and up against a side wall, and has the sewing machine on it. I've basted on this table, using the method where you roll each part of the sandwich around long boards, but it is incredibly cramped and awkward.

The only large unobstructed section of floor is outside on the upper deck, where it is almost always windy, and I'm not eager to kneel while basting anyway. So, what remains as a large flat surface is the queen sized master bed.


Here is a really bad photo of the mattress. The white splotches are spots of sunshine from the two small windows on the starboard side. Not a whole lot of light comes in through 8"x18" portlights, but it really contrasts with the darkness of the room!


A queen mattress is 60"x80", so baby and lap sized quilts fit easily. First I lay out the backing fabric, right side down, and smooth all the wrinkles out.


Then I pin around the edges, right into the mattress, keeping the backing as taut as possible. Our mattress is generic memory foam and the pins hold nicely. I use these pins only for this purpose, since they tend to get sticky from the basting spray.


Next, I smooth the batting on top of the backing. I know that conventional wisdom says the backing should be bigger than the batting, but I don't worry about that too much for quilting on my Juki. As long as both pieces are bigger than the top, it works fine for me.


Next, I fold back the batting about halfway. The little rectangles you see in the photo are small pieces of iron-on tape to connect two pieces of batting together. I use those and a zigzag stitch to make "frankenbatting" from batting scraps.


Using 505 brand spray baste adhesive, I spray directly on the batting, not on the backing fabric. I've found that I don't need all that much 505 in the middle, just a spritz every 8 inches or so rather than an even coating. It's more important that the edges and corners are well sprayed. I've tried several other brands and like 505 the best. If weather permits, I open the windows for ventilation. Otherwise, I just turn on the master bathroom fan to keep the air moving. I haven't noticed any irritation from the spray fumes, probably because I really don't use very much.


After smoothing the sticky batting onto the backing, I fold back the other half and repeat. The bed is a good height for me to be able to reach every part of the sandwich so I can really feel if there are any lumps or pleats. I can also walk around three sides easily.


Next, I lay the quilt top on the batting, checking to make sure it is roughly centered on the batting and backing and smoothing it down.


Then I repeat the process of folding it back halfway, spraying the adhesive on the batting, and smoothing it back down.


Again, it's important that the corners are well basted, since they get a lot of handling during quilting.


I also double check that the edges are stuck down well.


Ta da! All basted and ready to remove the pins from the mattress. This whole process takes me about 15 minutes on a quilt this size. Yesterday I basted two toddler quilts for Project Linus, and a gift quilt for a friend. That one was 62"x62", so it hung over the edges of the bed a little bit and took more time to make sure all the layers were flat.


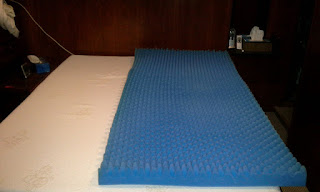
Lately, I've been basting quilts in batches on the day that I change the sheets on the bed. That's because we're testing this thick blue egg crate foam mattress topper to see if it helps my sore shoulder. We bought a hospital bed sized topper, which is roughly half the size of a queen bed and was cheaper to buy and ship. It goes under the mattress pad.


After the bed is fully made, the topper makes quite a lump on my side! I used to baste my quilts right on top of the fully made bed, but it simply isn't flat enough right now to do that. So now I wait until I'm stripping the bed anyway to make a suitable surface for quilt basting. If the foam helps my shoulder without being too soft for my lower back, we'll invest in a queen sized piece for the whole bed. The jury is still out, though.