Wednesday, March 28, 2018

A binding shortcut tip


It's "Tips, Tutes, and Tasty Things" week over on Sarah's blog. She has this link up every year as part of Hands2Help. So today I'm sharing my little binding short cut. In a nutshell: you don't have to trim off the selvedges after cutting your WOF strips. 


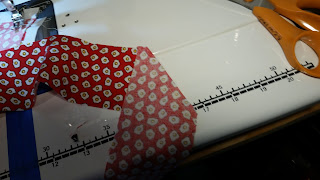
Instead, leave them in place while you sew together the strips at a 45 degree angle. Just make sure to place the strips as shown in this photo, with the selvedges hanging over past where the strips cross each other.


I have pieces of blue painter's tape on the bed of my machine that mark various seam allowances. The right edge of the longer piece of tape is aligned with the needle.


I don't mark the 45 degree line to be sewn. I put the needle down right in the corner where the two strips meet, then line up the other intersection point with that edge of the tape. My index finger is pointing to that spot. (When did I get old lady hands? Sigh.)


Then I sew from intersection to intersection, gently holding the two strips at right angles the whole time. You see the selvedges still well past the seam.


Without cutting thread, I then grab the free end of the top strip, flip it so it is right sides up, and place another strip on it, right side down. Again, I hang the selvedges past the cut sides.


Keep adding another strip to the end of the top one you just finished until you have the length of binding you need. At this point, they are all attached to each other from chain stitching.


With your scissors, carefully clip the chain stitching between just the last two sets. 


Then trim the 45 degree seam approximately a quarter inch. It's not important that it be exact because it will be hidden inside your binding. This removes most of the selvedge in one fell swoop!


What's left behind are the tiny "dog ears." Trim those with your scissors parallel with the length of the strips. Snip, snip!


Now your diagonal seam is neat and tidy. Clip the next chain stitching and repeat for each seam.


All the triangle trimmings and selvedges and dog ears end up in a little pile, easy to clean up. Don't feel guilty about tossing those right in the trash.


Next, I lay out the strips on my ironing board, sort of snaking them back and forth so that the seams are all roughly next to each other, with wrong side of the fabric up.


This makes it easy to press the seams open. Because I trimmed the dog ears, the pressed seams are pretty clean on the binding edges. Please don't look too closely at how stained my ironing board cover is getting. I'm going to miss those bright birds when I replace the cover. And yes, those are fried eggs on the binding fabric!


Finally, press your binding in half lengthwise as usual. Easy peasy! I'm all about reducing the number of steps in a process, and find this method to work well for me. I hope you find it useful, too. Don't forget to head over to the link up to read more handy hints.


Oh, and here's a sneak peek of my next project. I pulled fabrics inspired by the wonderful colors surrounding us here in the Bahamas...

Sunday, March 25, 2018

The UPS quilt


Today I finished this quilt top made completely of 2.5" wide scraps from my "dark neutrals" and "light but darker than off white neutrals" bins. I've been wanting to make a black and white quilt, but didn't have enough black scraps. So I added brown. The pattern is Myra's Jelly Roll Waves, which I won for participating in the Splash of Color QAL. It measures 50"x70".


When Sean saw the top, his first response was the UPS slogan, "What can Brown do for you?" So that's what I named it. If you click over to Myra's site, you'll see the "waves" in most of the photos are bright colors against a contrasting neutral. That's what appealed to me about the pattern. In my mind, this quilt was going to look like dark ribbons of chocolate against cream. But the high contrast isn't there, and I was originally kind of disappointed in that. However, it has really grown on me. 


There are tons of really fun scraps in this top, from old fashioned telephones to camping tents to snowmen to chili peppers to leaves and dog bones. The mix of browns and blacks and the softer contrast with the tan/taupe/gray background pieces gives it a more homey, old fashioned feeling. 


I made it specifically to donate to Victoria's Quilts as part of Hands2Help. Victoria's provides quilts to people in Canada who are living with cancer, and they've asked for tops only, not completed quilts. I think this top has a nice, masculine and almost woodsy vibe that could provide warmth and comfort to a man who is ill. Maybe he'll enjoy finding the little hidden images in all my scraps. 


I started piecing WCBDFY? when we were still in the Berry Islands and the water was this gorgeous turquoise. The water is this color when it is shallow, around 15-20 feet deep.


When the water is this lovely clear blue it means it is deeper. Much deeper. Yesterday we crossed over depths of 10,000 feet, almost 2 miles straight down. It was a little rough so I didn't sew until we made it all the way into Nassau harbor. Today we were back in turquoise waters, flat calm and lovely. I was able to finish the top while we were underway. While I love looking at the water, 6 hours of chugging away at 6mph leaves plenty of time to nip down to the studio for 10 minute sewing bursts. Enough little bursts and many seams are sewn.


For those of you who asked if I was able to put my sewing machine on the back deck to sew, the answer is not yet due to wind! I tried to capture the wind in my hair in this photo. That thing on my ear is my hands-free microphone headset for communicating with the captain while out on deck. I raise and lower the anchor on the foredeck while Sean maneuvers the boat from inside the pilot house. We learned early on that electronic doohickey communicators are real marriage savers! No yelling with these puppies, just conversation at normal volume levels. One of our training captains told us that you can use hand signals, too, but most couples still manage to yell at each other using only their hands and proceeded to pantomime an argument about where to anchor that ended with a flurry of hilarious gestures that left me in tears of laughter.

Wednesday, March 21, 2018

Goat Cay, Goop Craft

Greetings from the Berry Islands! We are anchored near a tiny island called Goat Cay (pronounced "key") and waiting for the wind to die down before we move again. Our next passage will be across very deep water, where high winds make big waves, so waiting is prudent. It's also too windy to sew out on deck, alas.

Sitting at anchor with no place to go ashore (the islands around us are all private) means plenty of time for relaxing and sewing. I've been working on a couple of scrappy projects, including my RSC2018 (Rainbow Scrap Challenge) blocks. March's color is bright green.


I've made four green string blocks,


and two green spiral blocks.


In addition, I've added to my clowder of rainbow crafted applique cats. These blocks are 12"x15" and use the RSC color as the background. Last month, I used 3.5" purple squares for the background, and this month I used 3.5" green strips. The cats are the opposite color on the color wheel and I am deliberately choosing the loudest, wildest fabrics I have in my stash. So flowered and fiesta-ed yellow cats on the purple.


And groovy pink and paisley red cats on the spring green. The colors are brighter than these photos show. I really like the swirly red fabric up close, but the hot pink floral looks better from a distance, I think.


A couple people asked me about my experience with the crafted applique, so here's a little bit of the process. I have a simple paper template of the cats that I just lay on the backside of the fabric. This big, easy shape is held in place with my hand, no pins or sticky stuff. If the shape was smaller, I'd probably use freezer paper ironed in place.


I lightly trace around the cat with a pencil.


Then I daub the magic Modge Podge goop* roughly on the pencil line using a foam brush. I would estimate that this is about a teaspoon of goop, total, spread over the perimeter of the cat. The book recommends putting plastic on your work space, but I just did it right on my cutting mat since the goop isn't very close to the edges of the fabric. It doesn't soak through to the front, either. It's also water soluble before it dries, so theoretically I could sponge off any spills.

*There are several formulas in the Crafted Applique book and I don't want to steal the author's intellectual property, so I'll use the term "goop." You should buy the book if you want to use this method. She does not show step by step photos of the gooping process, though, so I think I'm in the clear sharing this tutorial.


Then I spread the goop out thinner using the brush so that there were no thick spots that would dry as lumps. It's pretty easy to see the pencil through the goop. It doesn't need to cover the entire cat shape since its purpose is to seal the cut edges and hold them in place for applique. But it does need to cover the entire pencil line and about an inch inside, so I just roughly aimed for that. (The seam down the middle is just because I didn't have a big enough piece of the paisley fabric. Turns out that I should have moved the cat outline a bit left or right so the seam didn't end up right along the edge of the ear, but it worked out OK.)


After the goop dries in about 45 minutes, it is very clear and shiny. The pencil line is easy for me to see (although hard to photograph), and I cut right along it with my good scissors. It feels a bit tacky/rubbery but didn't leave any residue on the scissors. Now the edges of the cat are ready to be ironed onto the background, where they adhere quite nicely. I used a pressing cloth to protect the iron from any extra goop on the cut edges, although nothing stuck to the pressing cloth, so it probably wasn't necessary.

As the final step, I used my machine to straight stitch just inside the cat outline, a simple edge stitch next to the raw edge. Sorry no close up photo of this part! There was no shifting of the applique and the needle didn't get gummy or feel any different than going through 2-3 layers of fabric as normal. The goop is supposed to seal the edges so they don't fray. I won't know if that is true until I make enough cats to sew up a quilt. Stay tuned.

Sunday, March 18, 2018

Quick update from the Bahamas


We're finally here! And it's just as lovely as I remembered. Our Internet is super slow, though, so reading and writing blogs will be very intermittent. If you don't hear from me on your own site, I apologize in advance. I'm going to try to keep reading as much as possible, if and when pages will load. Getting a comment to go through will be an extra credit assignment!


Here's a quick look at my works in progress. Lots of cutting and sorting on some scrappy projects. I might bring my old Kenmore up to the back deck so I can sew with a view of that turquoise water...

Today we will leave Bimini and head to the Berry Islands. We'll stop halfway there to anchor for the night on the Bahama banks in about 20 feet of water depth. We'll be about 30-40 miles from the nearest dry land, something possible in very few places on Earth. By Monday afternoon we should be anchored in the Berries where we'll sit for a few days and let some windy weather pass us by. Hopefully we'll have a bit of connectivity there, but wind protection is more important and will drive our choice of anchorage. 

If you're curious about the position and status of the boat while we travel internationally, you can always check this Twitter link. We will use our satellite phone to post short updates there so our families don't worry about us.

Thursday, March 15, 2018

Postcards are from Sweden, chickens are from Key West


This week is the Step 3 check in on MMM Quilts for the Postcards from Sweden Quilt Along. We should have our triangles all sewn together and started piecing them into the top. Check and check. There is a possibility that more progress has happened, but that's neither here nor there. Although if a body just HAPPENED to be further along, a body need not feel guilty about that. As my friend Rose says, "Guilt and Quilt may rhyme but they don't go together!"


Oo, look! A stained glass shot! I like seeing how all the seams are pressed in opposite direction in this photo. Because I can't see the inside of the seams anymore, possibly because of further progress on this quilt that shall remain unmentioned.


Now here's a completely finished quilt that I don't feel guilty about at all. I pieced the top for this back in June of last year, so it was officially a UFO for quite a long time. When our visit to Key West was extended another few days, I figured I could quilt up one last top and ship it off the boat. I asked my husband which UFO I should work on, and he said, "The chicken one, of course!"


What makes a chicken quilt the obvious choice in Key West? Why, the Key West Chickens, of course! Feral fowl are everywhere in this town, and we heard roosters crowing every day. One saucy rooster tag teamed with a sparrow to steal food right out of my hand, too. That one thought he was some kind of feathered star, or something.


We both decided that getting photos with the quilt and the chickens would be fun, but the chickens weren't very cooperative. We couldn't find any until we were literally walking up to the post office front door to mail the quilt to Happy Chemo, a Hands2Help charity.


Feral chickens aren't afraid of much, but a big piece of cloth flapping in the wind, held by a man with suspicious intentions, is one of those things. Sean would sidle up to a few chickens and slowly unfurl the quilt, then they'd scatter. This group cackled and scolded and ran away into the shadows, leaving us with just a few bad photos. But the other tourists were amused, at least.


Key West Chickens was quilted with free motion orange peels in the focal blocks, and a four lobed design in the hour glass blocks. The yellow part of the hour glass is baby chicks, and the red is fried drumsticks. The full life cycle of a chicken. 


I used a 40 weight yellow thread which gave me fits by shredding and breaking. I changed everything: new needle, different tension, new bobbin, but no avail. After two rows, I gave up and tossed the spool in the trash and switched to a slightly different shade of yellow, which quilted the rest of the piece with zero trouble. Have you had that happen, where a particular color just won't work in your machine? It's happened to me three times. I'm wondering if the different dyes affect thread strength.


One of the "bad" colors in my thread stash is my only spool of black. I wanted to use black in the border of this piece, so I gritted my teeth and tried it again, hoping it would cooperate this time. Nope. Shred, shred, break, break. What to do?? The next closest color was navy blue, so I decided to try that. And you know what? It looks fine. If you reeeeeeealllllly look closely, you can see that it's blue, not black. But mostly it's just completely invisible. For the record, I did wishbones in the border (ha! like on a roast chicken!) and you can only see them here on the back. You can also see the binding, which is fried eggs on red. It's a very silly themed quilt, and I hope it will make someone smile.


Here's a parting shot of Key West Chickens with a bit of boaty flavor. We've left Key West now and will be crossing the Straights of Florida to the Bahamas tomorrow, hooray! Next time I post will be from the Islands.

Sunday, March 11, 2018

Free fabric and a finish


Look at all this super cute ocean themed fabric! My friend Karen, who blogs over at KaHolly, sent all these pieces to me last week. Wasn't that sweet? She thought I would get around to stitching them up into a quilt long before she would, since it's been marinating in her stash for about five years. I couldn't resist working with them right away.


It's a series of 12 squarish panels that can be sewn into a soft book or a toddler quilt, plus some nice coordinating scraps in bright colors. I used the scraps for cornerstones, added some mottled yellow sashing and pieced this up into a simple 3x4 layout top. The bold, happy fish designs do the heavy lifting to make this fun, so I think simple piecing was all it needed. 


Fabric panels are notoriously uneven in size, and these were as much as 3/8" different in height and width from each other. However, there is a curvy, squiggly darker blue printed on the edges of the blocks, making an easy transition to the yellow sashing, no matter what the overall size. The top is about 36"x46", a good toddler quilt size. I'm going to donate this one to Little Lambs, which is one of the charities for Hands2Help this year. Sarah announced the challenge today; go take a look if you're interested. The quilts aren't due to be shipped until June, so I have plenty of time to quilt up these fishies. Thanks so much, Karen, for sending this packet of fun!


Meanwhile, I completely finished this quilt, called Olympic I-Spy. The Sunshine Online Quilt Guild had a little challenge during the winter Olympics games to stitch something up in the colors of the Olympic flag: red, blue, yellow, green and black. 


I used those colors to border little I-spy blocks in contrasting colors. It was fun and fast and the colors are bright and cheerful.


I sandwiched the top up with this happy red and white heart fabric and Warm and Natural batting. It's fairly thin, so the whole quilt is sort of a lightweight summer piece. The binding is a bright stripe in all the Olympic colors plus orange, but it works fine. 


I did big, soft floppy feather quilting to keep it snuggly. This motif is fast, fun and forgiving of a bit of lumpiness and asymmetry. Being personally both lumpy and asymmetric, this works well for me. My feathers are getting better in the middle of the quilt, but edges are still a challenge. I also managed to catch a big fold in the backing all along one edge, so a bit of frog stitching needed to happen (rip-it! rip-it!) Quilting will keep you humble, folks.


Here is the quilt being inspected by Number 17. It passed with flying (Olympic) colors, and then took a spin through the washer to get rid of cat hairs and other impurities. The cursing I did during the stitch ripping washes out, right?


Olympic I-Spy has already been shipped off to one of the coordinators for the Wrap A Smile quilt charity. You can read more about WAS here if you're interested. I didn't think I'd have time to mail any more quilts while we were still in the US, but we've been sitting in Key West for over a week waiting for a good weather window. Please note that this is NOT a complaint!


We use maps like this to help us decide when to leave on longer passages. The trip to the closest Bahamian island, Bimini, from here will take us about 24 hours. So we're looking for the map to be white and the lightest blue along our route during that time. That medium blue means the waves could be as high as 6 feet, which can be uncomfortable (but not dangerous.) Given the choice of enjoying another few days in Key West vs. getting bounced around on passage, we'll most likely keep waiting for smoother seas. Like quilting, boating is supposed to be fun!