Sunday, June 26, 2016

Tombigbee River

I am slowly piecing another Project Linus quilt while my WIPs whimper quietly in the corner. It's just too darned hot to even think about cutting batting, basting and handling an entire quilt sandwich. I'll stick with small pieces of fabric for a while.

About six months ago, I bought a group of novelty fabric samples on eBay. The focal fabrics for Charming Cupcakes came from that batch, as did many of the fabrics in Scrappy Chili Peppers. There were also quite a number of racing themed fabrics, and that's what I'm using for this latest quilt, called Let's Go To The Races!


Some of the race cars are sort of cartoon-like, and others are fairly realistic. There are checkered flags, flames, and monster trucks. While I don't usually purchase anything with a black background for kids' quilts, the bright primary colors of the cars and trucks look great against the black.

The fabrics were part of a traveling quilt shop salesperson's samples, and so were cut 13" wide, with lengths varying from about 6" to about 20". They were stapled together so that the shortest pieces were on top and the longer ones peeked out below. I wanted to use as much of each fabric as possible and settled on cutting 5"x12" rectangles. Almost all the prints are directional, and this wide format block captures a sense of the cars moving sideways, I think.


The pattern is a version of Shadow Boxes, or Missouri Star's Illusions. Offset strips of gray make it look like the block is "floating" above the yellow background. Here I've laid out my first two test blocks to show how that will look. The illusion works best when there are more blocks. It will have 24 blocks, three across and eight down. That should make a nice size quilt for a young race fan.

This is a really simple pattern: nothing but long strips and straight sewing. All the sashing and shadows are the same, so there's nothing to keep track of. I can sew one piece or 20 without losing track of where I am. A good fit for highlighting the fun racing fabrics while keeping my time in the sewing room short and sweet.

Monday, June 20, 2016

Mobile, AL

Oof, it's hot here. I haven't been getting a lot of sewing done because we've been at a dock with no power outlets. That means we have to run the generator for air conditioning, and we try not to do that 24/7. The generator is great for charging the batteries, which only takes about 2 hours per day to do. Any additional time running just to make cool air means a hot, noisy engine room and shorter intervals between oil changes and other maintenance. So if it's breezy and comfortable out on deck, that's where we hang out, not in the stuffy below-decks quilt room.

It's taking me a while to get used to this new schedule. I'm used to wandering downstairs when the muse strikes, and sewing for a few minutes or a few hours. Now I need to sew when the a/c is on, and it isn't always when I'm in the mood! But I did manage to get all my scraps sorted and put away, so the whole room is feeling more streamlined and clutter-free.

While we were in Pensacola and had a good delivery address at the marina, I ordered some marine fabric from Sailrite.com. Half of the pillow covers up on the flybridge are getting faded, so I ordered more of the higher quality Sunbrella upholstery fabric to re-do those. In addition, I got three yards of black Phifertex to make exterior window covers.

Phifertex and Textilene are two brands of similar materials. They are vinyl-coated polyester and are commonly used in the mesh seating on "sling" style patio furniture. Think strong, thick, durable, and plasticky. The weave is fine enough to provide good shade while being open enough to see through in bright light. Our boat came with a set of covers custom made to fit most, but not all, of the windows and that snap into place.

If you look at the boat photo at the top of the blog, you'll see the front three windows have covers. You'll also see that there are three windows in the back under a fairly deep overhang. The sun only hits those in the early morning and late afternoon and we have good interior blinds to cover them. But now that we're in such hot weather we decided we really needed exterior covers for them. 

These back windows are identical on both side of the boat, so I figured I could make a single cover that could be moved from one side to the other as needed. When we're at anchor, the direction of the wind and the current determines which way the boat faces, so on any given day the morning sun could come in any window.  

Even though the outer two panes are trapezoidal, I didn't try to match those angles and sewed up a large rectangle to completely cover all three panes. Once the cover is in place, you can't see the panes anyway. And there's no way to see both sides of the boat at once to compare window shapes. 


Here is the finished cover, snapped in place on the port side. The other window that needed a cover is the one on the left side of the photo, which is above the galley sink. With no shading overhang, that one really takes the full brunt of the sun so I wonder why it never had a cover to begin with.

The big cover is made from a single piece of Phifertex, 108" long by 40" tall, with 1.25" hems on all four edges. That's a really, really, really big piece of really, really unwieldy fabric. I cut it to size in the quilt room by unrolling a bit, then cutting, then rolling the cut piece, then unrolling some more to cut. The stuff doesn't fold well, doesn't take a crease, and is impossible to mark with pen or pencil. I started wrestling with it while the a/c was off, but that lasted about 5 minutes before I cried uncle. Once the room cooled down, the material got even stiffer and harder to work with, but my attitude improved. Getting all that stiff, recalcitrant fabric through the sewing machine was not for the faint of heart, either. Fortunately, it sews pretty easily with a heavy duty needle and UV resistant thread. The Little Kenmore That Could just chug-chug-chugged through all the seams, even up to six thicknesses at once. The biggest issue during the sewing, besides just wrangling the giant piece into position, was that the very thick UV thread tended to jam to bobbin. 

The material comes 54" wide off the bolt, so I cut up the remaining skinny strip and pieced the galley window cover.


This photo shows the lapped seams I used to join the pieces. Phifertex doesn't ravel, so this was really just to get the sections to lie flat. There's no way to iron this stuff so I'm glad these were fairly short (34") chunks. I had a spool of white, UV resistant polyester thread. I like the contrast with the black covers.


Here's a corner that shows the nice stainless steel snaps we used. I had to buy a snap installation tool from Sailrite since stainless snaps are really tough and need a special hardened tool. Sean installed the snaps, punching holes through the corners of the covers for the female part, and drilling holes into the boat to screw in the male part. I assisted by holding the vacuum cleaner under the drill to catch metal shavings, and handing him tools as he balanced precariously on the boat railing to drill the upper holes. I swear that man has prehensile toes, the way he gripped that railing. Fear of falling in the Mobile River will motivate a man's toes, it seems.


Here's the galley cover snapped in place. The camera flash reveals the curved shape of the window frame underneath. Without the flash, the covers look opaque and provide a lot of privacy during the day. At night, the lights inside the boat are easy to see, so we use our interior blinds for privacy.

All in all, this was a satisfying project. This afternoon we moved to an anchorage, and the covers really helped keep the boat cooler. These two covers would have cost at least $300 to have made. I paid about $60 in materials plus the $30 tool and they looks just like the professionally sewn ones that came with the boat. But I'm glad to have marine sewing behind me for a while. To celebrate, I cut up some quilting cotton for the next Project Linus quilt (spoiler alert: race car theme!) and it felt like gossamer butterfly wings and unicorn farts compared to the Phifertex.

Thursday, June 16, 2016

Pensacola, FL

I am merrily sewing away while Sean is in Virginia again dealing with the bus for sale. For more about that subject, you can read his post on the travel blog. Since he flew this time, we needed a place with an airport to leave me, the cat, and the boat. Pensacola had decent flights, so here I am.


I made some decisions about the Dragonfly quilt, but left it set aside in my growing pile of WIPs (Works in Progess.) They hang on a spring loaded curtain rod placed between two of the cabinets in my studio. Can this actually be called a pile if its hanging? Maybe it's a drape of WIPs? In any case, that's three quilt tops and two quilt backings there, ready to be sandwiched, basted, then quilted.

But I'm in a piecing mood, not a quilting mood, so I started yet another quilt top. It actually sort of makes sense to do this now while the boat is in a marina with constant power and constant air conditioning. Piecing requires a lot of back and forth between sewing, ironing, and the "design wall." Which in my case is the "design bed," since there isn't a single wall on the boat big enough to use for that purpose!


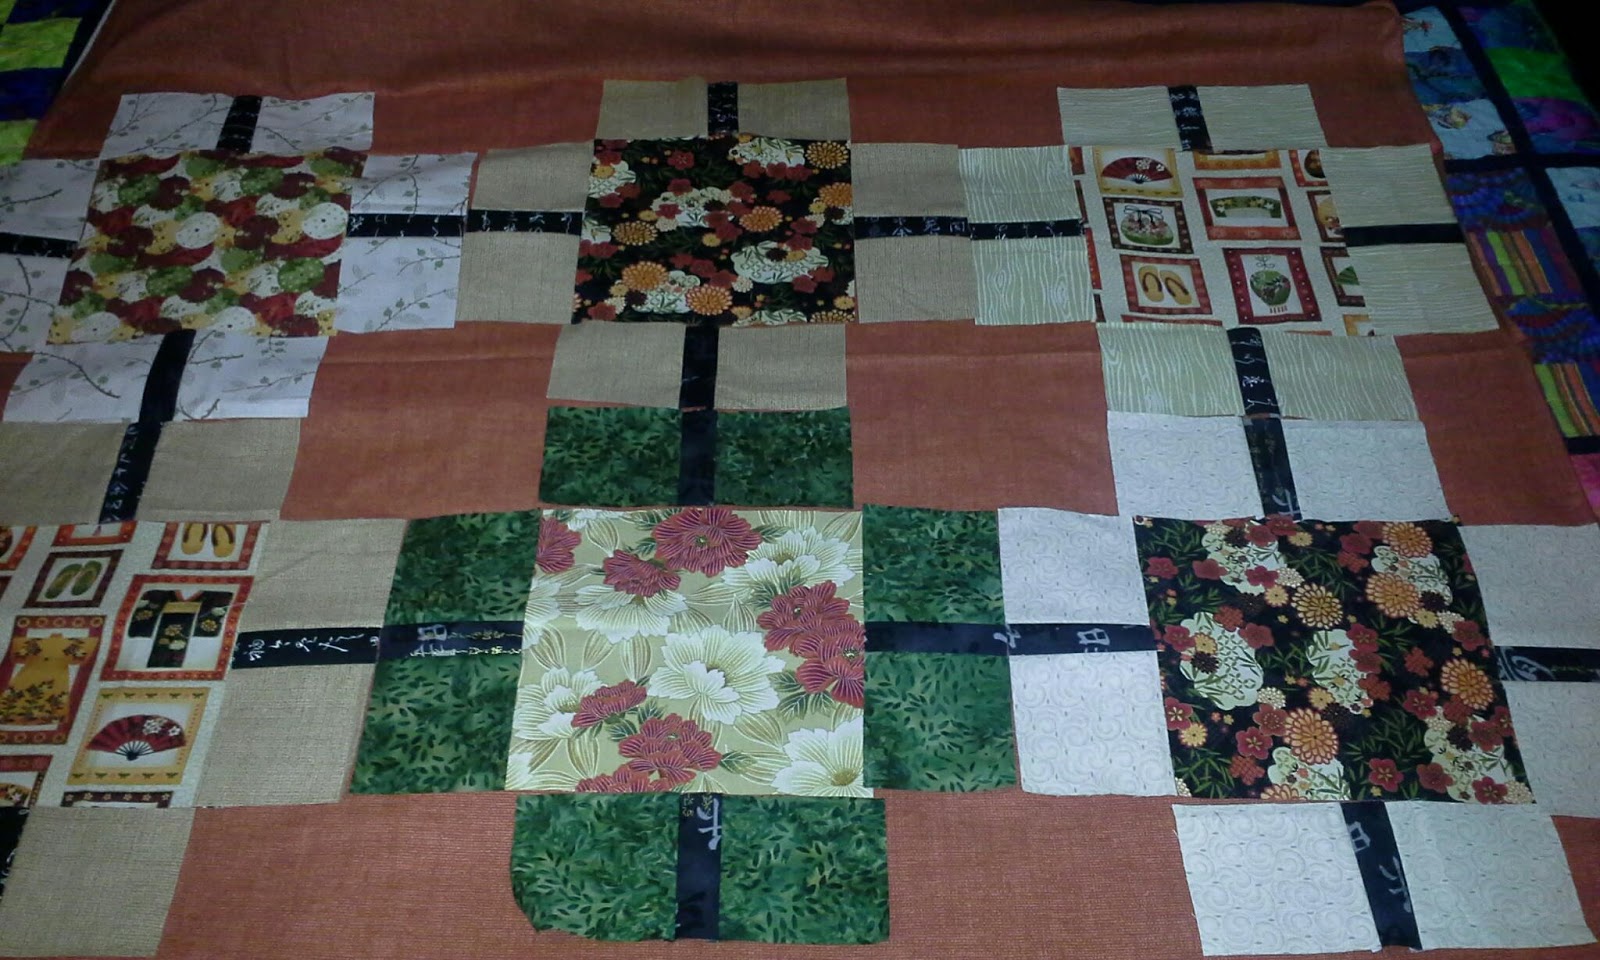
This is another gift quilt. The focal fabrics are all from a Makower UK line of Asian-inspired designs, called "Kimono." I thought they'd play nicely together in a pattern called Natural Beauty designed by Lori Mason and available free from American Patchwork and Quilting. Here's the cover photo from the pattern:


The pattern is written to use certain fabrics in a precise order so that the thin lines (purple and orange in the pattern photo) line up in a certain way. But since I'm sewing from my stash, I didn't have an exact one-to-one correspondence for the pattern fabrics and would need to use smaller amounts of more fabrics. I'd also need to cut up enough pieces to start laying it all out on the bed to see what worked. 

I wanted to use black as the background, rather than the cream in the pattern. Actually, I really like the cream, but all I have is a fairly pure white that didn't work at all with the Asian fabrics. My perfect cream fabric happens to have distinctive silhouettes of dogs on it; not a good thematic match.


Ew, that didn't work well at all. Hmm. How about this rusty orangey fabric as the background?


Better, but that color is kind of an acquired taste and I'm not sure the recipient will like it. (By the way, the lighting is TERRIBLE in the master stateroom and my cell phone photos just make it worse. You'll have to trust me that this color actually did work, because it looks like dog barf in the photo.) 

Next I tried a brighter red, with some of the border fabric alongside to hide the underlying bed quilt.


Wrong bright red for these fabrics, and too Christmassy anyway. Even though the focal fabrics have red and green in them, they don't scream Christmas until big chunks of red and green sit side by side. Aha! That's the problem: the green fabric.


Mo' better. Replacing the green with a neutral makes the black background work much better. There was too little contrast between the black and the green. Back into the stash to find another gold/beige/tan/cream neutral. I have a tub full of neutrals but alas, nothing that was right. Drat! I could have sworn I had a nice sort of wood-grained looking gold-y-ish fabric.


Oh, there it is, peeking out of the scrap pile from Hades. This is a shot of the bathroom counter in the quilt studio, where I've been tossing scraps and recent purchases that need to be folded and put away. Guess it's been awhile since the "put away" part of the process has happened. 


Now I could start sewing in earnest. Lots of squares and rectangles in this quilt that meet at their corners. In order for it to look crisp and nice, all the seams needed to be carefully nested. I had an Aha! moment on seam nesting today. Usually, I just press and nest the seam right along the stitch line with one finger, like this:


But today I started nesting the seam with more fingers, along three or four inches, like this:


Actually, I use a couple fingers of my right hand, too, but they were taking the photo. Lining up more of the seam made everything feed better through the machine and less likely to slip on the corners. So that worked much better. Probably most quilters already know that trick, but I had never heard of it before.

And here's the (probably) finished quilt top:


It may get a thin outer border of the same black background. The size is good as-is, though. I had to stand out on the port side deck and take the photo through an open window to get far enough away to fit the whole thing in the frame using my cell phone camera.

The actual sewing went pretty quickly on this one. Probably more time was spent pondering patterns, layouts, and the sorry state of the "to be put away" pile. I guess that's my next task!

Sunday, June 12, 2016

Choctawhatchee Bay

I finished piecing the Disappearing Four Patch top using all dragonfly fabrics. I've only been able to sew while the air conditioning is running. It's just too hot in my little quilt room otherwise, and waaaaaay too hot if I'm using the iron!


The top is 42"x42", which is a great size for a baby quilt. Unfortunately, I had it in my mind to give it to an adult friend. Hmm. I'm going to set it aside for a while and think about whether I want to expand it or not. I could certainly add borders, which would keep it square. Or I could add top and bottom rows of something fun like pieced bird blocks. Or, I could go a completely different direction for my friend's quilt and donate this one to Project Linus.

Linking up with Oh, Scrap because every fabric is different. I bought them as a group of precut 4.5" squares, but it's clear they were never part of a single fabric line. They were carefully collected by someone with a love for dragonflies. That eclecticness gives the piece a nice, scrappy look.

Monday, June 6, 2016

Waiting for Colin

We are sitting in a marina in St. Marks, FL while Tropical Storm Colin creeps up on us. Meanwhile, I have a batch of dragonfly fabric squares that I'm sewing into Disappearing Four Patch blocks.

Start with a four patch:


Slice it into nine pieces:


Rotate every piece except the corners 180 degrees:


Sew them back together:


I bought these squares of dragonflies as a precut collection on eBay. The seller clearly had been gathering the fabrics for years. There were 72 squares in every color of the rainbow, each with at least one dragonfly showing. I'm thinking I'll probably assemble them in rainbow order to give the finished quilt some cohesion.

The Disappearing Four Patch block shows its structure best when there is some contrast between the two non-background squares. In this one, there is enough difference between the light blue and the medium blue to show how the squares sort of overlap in the center of the block:


However, in order to put the finished quilt in rainbow order, I need to have blocks where the two focal fabrics are close to each other on the color wheel. That way the finished block will have a clear place in the rainbow. Two green fabrics make a green block, but where would a purple/yellow block go?

I spent quite a bit of time going back and forth between wanting to punch up the contrast in each block and wanting to make sure the finished quilt wouldn't just muddle into color chaos. I'm not sure I made the right choice yet!

The tricky part of this block turns out to be how to iron the seams. There are lots of little junctions between the white background and the various colors of fabric. In order to keep those corners crisp, it's best to nest the seams at every stage of sewing. That includes the stage where each block is sewn to another block.

There are two layouts for joining the blocks together. Alternating the larger white and focal fabric squares looks like this:


Rotating two of those block so that all the focal corners (and then all the white corners) meet up looks like this:


I haven't decided which layout I want to use, and I want the seams to nest between blocks no matter what I choose. Hmm. Topologically, that doesn't really work out well! After a lot of head scratching, middle-of-the-night pondering, and failed sample blocks, I came up with a solution. Here's the back of a block:


It turns out that if all the outside seams are pressed so that they rotate in one direction, any block layout will have nested seams at all the intersections. Hooray! In the photo above, the seams on the side with the yellow pencil are all pressed upward. The ones on the side with the brown pencil all go left. Opposite the yellow pencil they go down, and opposite the brown pencil they go right. So the seams flow around the back of the block counter clockwise.

That sounds good, but as you can see it actually looks a bit ugly. I was able to open three of the intersections and "swirl" the seams into submission, but two places still just had to get squashed down strangely. Fortunately, the fronts of the blocks look okay and I've been pretty happy with my points.

It's all too easy to start sewing things in a slightly different order and end up with a block where the final seams flow clockwise instead. So I have to force myself to only assemble two blocks at a time, laying all the pieces out carefully in a particular order at each stage and not jumping ahead.


I'm about half way through making the blocks. Next time I should have some layout photos to share.


Sunday, May 29, 2016

St Petersburg, FL

When I started this post, I was in St. Petersburg. My fabric is still there, but I am not, alas. We rented a car and drove 14 hours to Lottsburg, VA where our old motorhome is stored. We sold it on eBay and now we're cleaning it up and fixing a few things to get it ready for the buyer.

The whole process has been full of glitches, but that's a story for our travel blog.


Before I left town, I got a few quilty things done, though. I finished this quilt top, using some of the fabric that arrived in my my latest batch of mail. The pattern is called "Movement in Squares," written by the lovely Wendy Sheppard. It's available for free from Benartex.

The pattern is well-written, easy to follow, and went together pretty quickly. It finished at 54" x 62" and will be a gift for a friend who is struggling with health issues. I have enough of the turquoise polka dot for the entire back.

I did modify the pattern a little so that all the non-black rectangles and squares are different fabrics. That allowed me to use fat quarters, since each color was then less than a quarter yard. I also calculated whether the pattern could be made with a jelly roll instead of yardage, and it could if there were at least two duplicated strips in the roll.


I also finished binding this gift quilt. It needs a trip through the washing machine and we'll see if/how it crinkles up with cotton on the front and fleece on the back. 


These blocks were sent to Covered in Love for Kat's May block drive. She asked for a soft palette of grays, blues and yellows. I didn't have a lot in my scraps, but managed to squeak out two blocks. The finished quilts should be gorgeous!

Over on Red Letter Quilts, I won the drawing for a copy of the new Crafted Applique book by Lara Buccella. I had already purchased an electronic copy of the book, and Lara graciously refunded my money in lieu of sending me another book. I'm quite excited about trying this new applique method, which uses Modge Podge to keep the raw edges from fraying. Thank you Heidi and Lara for offering the book giveaway!

We have been living in the motorhome for several days, and remembering all the things we like and dislike about it. I didn't start quilting until we moved onto the boat. There's so much less space on the motorhome, so my hat is off to those who sew in RVs. Claudia, I don't know how you manage!

It doesn't take any extra space to think and dream and plan, though, so I've been doing quite a bit of that while away from my studio. We found out that a dear friend is retiring at the end of the year, so I've been looking through patterns and researching colors for her quilt. And the Hands2Help charity drive ended this week, and it's been fun to look through all the finished quilts that are being donated. Scroll down to the bottom of this post to see the wonderful variety.

Sunday, May 22, 2016

Hands 2 Help quilts finished


This week marks the end of the Hands 2 Help Charity Challenge.  Sarah has been herding cats for a couple weeks, keeping all us quilters on track to make and donate our quilts. Each year, she selects several charities to receive the bounty. I was so happy to see that Covered in Love was chosen as one of them, and my two quilts will be shipped off to Kat soon.


My two finished quilts are Bright Bento and Scrappy Chili Peppers. They are destined to be given to a person who is receiving end of life care in a hospital. I hope they brighten up the room a little bit during such a sad time.

Kat says the chaplains at the hospital help choose a quilt from their small supply. She has heard many stories of how a quilt can really resonate with the recipient and their family...perhaps because it is in a favorite color, or features fabrics that reflect of love of gardening or bird watching, etc. I'm honored to contribute to a pool of quilts as diverse as the families that will take them home.


The back of Bright Bento used up most of these sweet prints in soft baby blues and pinks. They coordinate surprisingly well with the vibrant Rowan fabrics on the front.


A close up to show some of the crinkly texture after washing. I wasn't sure I'd be able to get this one washed in time to meet the shipping deadline. Kat offered to wash it at her end if necessary. Using the washer and dryer on board the boat requires careful planning. The washer uses a large percentage of our available water, so it's best if we're at a dock where we can refill the tank from a spigot. Since we ended up spending one night in the water at the boatyard, I washed it quickly and then hung it to dry in the engine room. It's nice and toasty in there.


I didn't realize until I started taking photos of them together that they aren't the same size. No wonder it took so much longer to quilt Bright Bento. I also thought it would be calm this morning, but they flapped around so much even on the protected back deck that I was getting nervous they would take flight across the water. Quilts sinking slowly to the bottom of the Manatee River won't help anyone!

It was a real pleasure making these two quilts and I'll definitely participate in Hands2Help again next year. A big thank you to Sarah for coordinating the Challenge!